How to photograph spiky fireworks with long exposure
Jul 1, 2024
Udi Tirosh
Udi Tirosh is an entrepreneur, photography inventor, journalist, educator, and writer based in Israel. With over 25 years of experience in the photo-video industry, Udi has built and sold several photography-related brands. Udi has a double degree in mass media communications and computer science.
Share:

David Johnson’s series of long-exposure fireworks photos with a focus pull technique has gone viral around the web. Many people have been asking about the exact technique and settings, so I thought I’d construct a quick tutorial on how to produce photos like these, especially with all the fireworks displays coming soon on the fourth of July if you live in the United States.
Gear List
- You would need a camera cable of bulb mode. In my case, I used the Canon EOS 5D Mk II
- A lens where you have access to the focus ring. In my case, it’s the Canon EF 50mm f1.8. Now, this is a prime lens, but you can use a zoom lens as well. In fact, if you are not sure about the final location of the fireworks and your composition, a zoom lens will give you more flexibility. Otherwise, plan for a focal length of 50mm or closer.
- A Neutral Density Filter to allow for longer exposures without getting overexposed. Typically, an ND2, 0.3 will do the trick.
- You would want to avoid any camera shake, so a good tripod is a must
Preparation
Know your lens and know the limit. Know EXACTLY when the focus will be tack-sharp on fireworks. You don’t want to use autofocus for this. It will just “hunt in the dark. Instead, use manual focus and set the focus to just a smidgen before infinity.
Tripod must be sturdy, and using a shutter release in BULB mode is ideal (these shots were using the on-camera shutter button)
Camera settings
- Varied ISO: from 100 to 400
- F-Stop: f2.8 – f7.1
- Shutter speed: 1s – 2s. Using bulb mode will give you the most control since you can sync the exposure time with pulling focus. Either way, for this effect, you will need a longer shutter speed, you don’t want to freeze the fireworks.
- You’d also want repeatability and control, so make sure you are on manual mode and adjust from frame to frame.
- This goes without saying, but the flash should be off.
- Again, it is pretty trivial, but use RAW files so you can have more leeway in post-processing. You are taking it slow, so the benefits of shooting fast jpeg files are not relevant here.
Photographing fireworks
1. Prepare: when you hear/see a firework shooting into the air, try as hard as you can to predict where it will explode. Unlike traditional firework photography, where you want some foreground element, in this kind of photo, you only want to capture the fireworks themselves, so plan for a relatively tight frame.
2. I know most firework photography tutorials tell you to shoot in bursts to optimize you timing, but this is not the case togetting the fireworks cones. Instead, you will have to nail each photo separately. Do plan for some trial and error. Begin the exposure shortly before you predict the explosion. Start OUT OF FOCUS
3. When the fireworks explode, quickly change your focusing and refocus your lens throughout the explosion until you reach the tack-sharp focal point, where the fireworks will be in focus.
4. Once the perfect focus is achieved, END THE EXPOSURE by releasing the shutter button (bulb mode)
You will quickly see how the out-of-focus light refocuses and converges to a small point… creating floating sea creatures in the sky!
By varying the aperture (f-stop) size, the width of the tentacles changes.If you use a 7.1 aperture, the out-of-focus light will be thin and sharper, and as it converges, the tentacles will be long and thin. If you use an aperture like 2.8, the tentacles are thick and very large, creating an entirely different feel to the image.
Using the neutral density filter is crucial as trying to capture something as bright as fireworks with a bright f-stop (like 2.8) results in over exposure where the true colour content of the fireworks gets dissolved into white.
Here are some examples & settings used for the images. Each setting and timing will produce a different composition, so feel free to experiment.
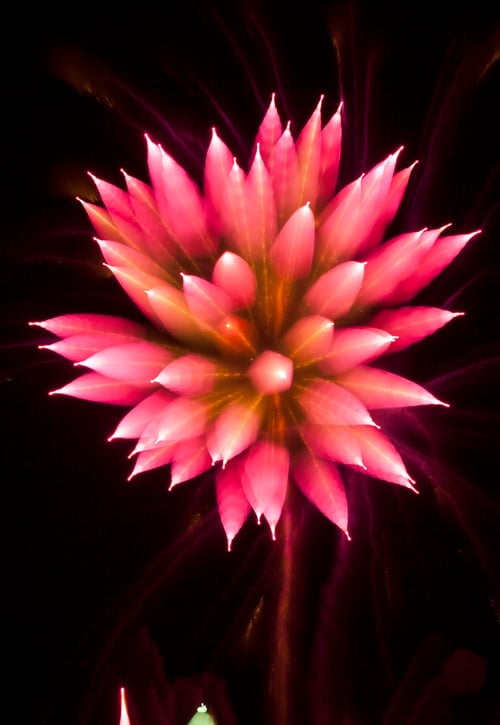
For this exposure of a flower-like firework, I began the exposure early to capture the ‘stem’ of the flower (the partially illuminated spark of a pre-detonated firework). When the firework exploded, I refocused to a fine point and ended the exposure.
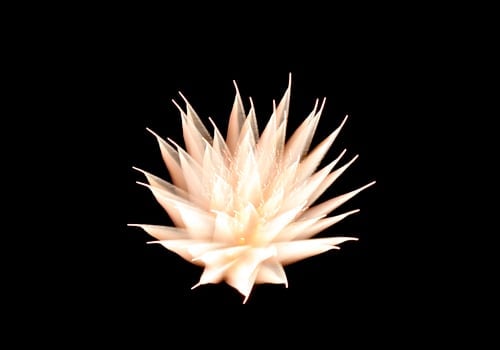
This exposure was much like the previous, with the exception that I began the exposure immediately before the explosion… no ‘stem’ for the flower in this shot. The thinner petals on the flower are the result of the smaller aperture (f/8)

This is a prime example of what an aperture of 2.8 will give you. You can barely see any tentacles on this ‘microscopic virus’, because the refocusing technique was used quickly and precise. The sparkles were a convenient addition from the previous explosion. This is why timing is so crucial.
The opposite effect can be achieved by beginning the exposure and the lens IN FOCUS and refocusing to OUT OF FOCUS to become blurry. This effect is present in the next few examples:
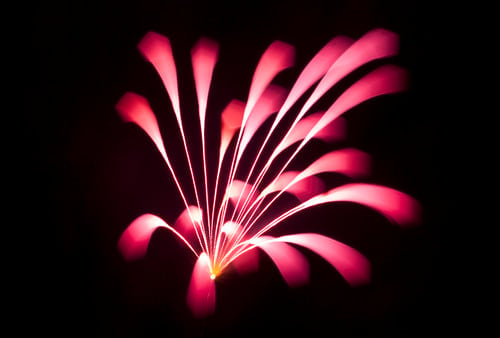
This exposure began in focus, and refocused out during the exposure. The tight aperture allowed for a crisp and detailed entrance into the explosion, with blurry tails coming afterwards. The 4s exposure was solely due to a quick unexpected break in the fireworks… so I patiently waited until the next explosion before ending the exposure.
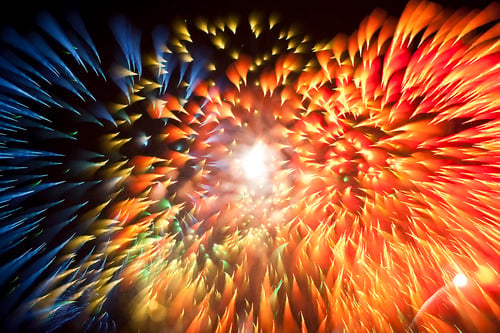
Here is a very dramatic outcome to using the opposite technique. This photo came from the finale of the show, where several fireworks exploded at the same time… allowing me to have the same effect on each one. I began in focus, and refocused quickly to create this scary colourful space monster. This is one of my favourites.
For these photos, LIMITED EDITING WAS REQUIRED. To get the most out of the photo, it helps to have an entirely black background… so because of this, here was my process to retouch the photos. You can use Photoshop, Lightroom, or any editing software:
- -Contrast +15%
- Bring the ‘blacks’ slider down and make sure you don’t lose detail in the process
- Mild saturation (+5%), make sure not to cap out any of the colours in oversaturation…. looks very fake that way
I hope to see more of this technique used in the future…. I’m definitely not the first person to use it, but I’ve found with precise timing and effective use of the focus-pull you can create something as exciting as this.

Udi Tirosh
Udi Tirosh is an entrepreneur, photography inventor, journalist, educator, and writer based in Israel. With over 25 years of experience in the photo-video industry, Udi has built and sold several photography-related brands. Udi has a double degree in mass media communications and computer science.


Join the Discussion
DIYP Comment Policy
Be nice, be on-topic, no personal information or flames.
26 responses to “How to photograph spiky fireworks with long exposure”
COOL Tehnic!
Amazing :) Cool idea ^_^
not bad :)
Hi how to do the focus on? do it manually by spinning the ring focus?
Nothing like giving back and teaching….. thanks
Looks like every piece of rubbish finds its bin…but interesting for 5sec
Looks like every troll finds it’s post…not least bit interesting for 1 sec.
Fantasic!
awesome, thank you!! worked great!
Here are a few I took after reading this article:
http://www.flickr.com/photos/toyotafreak88/9221421408/
http://www.flickr.com/photos/toyotafreak88/9218615691/
http://www.flickr.com/photos/toyotafreak88/9221389618/
Hi there ! Thanks for sharing this knowledge.
I tried to improve this technique not to make a still picture but a video : https://vimeo.com/70434168
Tell me what you think of it !
awesome stuff! saw you got Stuff picks! congrats.
Very nice, I had not seen this done with video. Thanks Stanislas.
I had some success with this over the weekend
https://www.facebook.com/photo.php?fbid=447988111976020&set=a.447987818642716.1073741846.254024394705727&type=3&theater
This one captured a weird alien hand holding a flower. ;)
https://www.facebook.com/photo.php?fbid=447988065309358&set=a.447987818642716.1073741846.254024394705727&type=3&theater
thank you so much for the explanation, i was searching for and all my doubts were answered.
In action: Abstract and Realist Firework Photos: Independence Day http://t.co/98TxDV5WMN
My version
https://500px.com/photo/84787703
Lesson #9 Lilly Figueroa But I don’t like to ruin fireworks presentations. They’re beautiful just they way they are.
Nintendo and super Mario bros come to mind whenever I see this.
Jessica Gandy Peppers you need to try this!
Thanks, can’t believe it – a tutorial that’s useful and original.
Thanks for the great info. Made the fireworks show a real joy to not only see in person, but to see what was created in camera.
It’s the first step that kills me. I can never quite figure where the ruddy things will explode properly!!!
Thanks for this tutorial. I’ve seen this technique and wanted to try it. This year I finally have my good camera and hope to get some of these beautiful shots.
I remember seeing this exact article here many years ago already. Hence also the comments on this article, which date back to 5 years ago.
This is awesome and I can’t wait to try it tonight. Thank you very much for sharing.
I have one question ( I’m using my Nikon D750 full frame): how to a focus the shot while the camera is on the tripod without touching it or causing vibration while the lens is open?
Wow this takes me back!!